테마, 캔버스, 애니메이션
캔버스로 애니메이션을 만들어서 사용해봅니다

HTML에서 캔버스는 애니메이션, 그림 구현에 특화된 강력한 도구입니다.
- 테마 버튼 구상
a. 디자인 - 구현
a. 기본 상태, hover
b. 애니메이션 준비
c. 애니메이션 실행
d. 결과 - 테마 변경
- 파일 구조
- 마무리
- 연관 포스팅
1. 테마 버튼 구상
“버튼을 클릭하면 테마가 다크 모드, 라이트 모드로 바뀌고, 애니메이션을 보여주고 싶다.”
a. 디자인
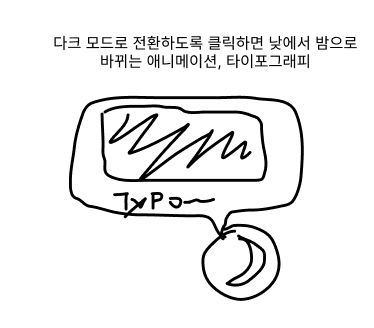
버튼을 누르면 말풍선이 튀어나오면서 다크 모드 애니메이션과 타이포그래피를 보여주는 건 어떨까?
→ 말풍선은 대화형 상호 작용에 적합하지 않을까? 사용자가 모드 버튼을 통해 대화, 혹은 비슷한 상호 작용을 할 일은 없다. 다른 걸 해보자.

버튼을 hover하면 화면을 켜는 듯한 효과를 나타내고 클릭하면 시간이 흐르듯 애니메이션을 나타내보자. 복고풍 게임 사용감을 주고 싶다.
2. 구현
a. 기본 상태, hover
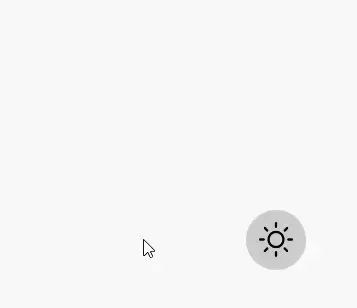
먼저 moon을 그려서 정보만 가져온 뒤, 바로 sun을 그린다. 매우 빠르게 진행하기 때문에 사용자가 moon을 볼 일은 없다. 이렇게 해서 초기 화면이 구성됐다. 이제 애니메이션을 구현해보자.
b. 애니메이션 준비
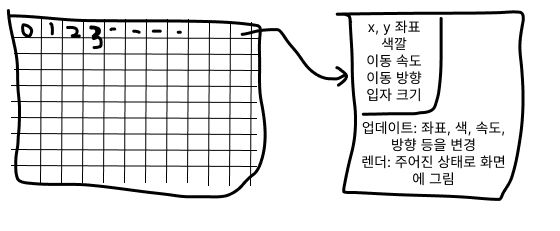
가로 140, 세로 80만 해도 픽셀이 11,200다. 원하는 애니메이션을 구현하려면 입자들이 이 공간을 전부 칠할 수 있도록 구상해야 한다. 1개의 입자만으로도 구현할 수 있지만, 여러 개의 입자들로 캔버스를 칠하고 싶다. 이럴 때에는 동일한 로직을 가진 객체를 여럿 만들어야 하므로 클래스가 적합하다.
- 상태: 캔버스 컨텍스트, 캔버스 가로, 세로, 입자를 칠할 각도, 좌표, 색, 속도, 방향, 반지름
- 액션: 상태 변경(update), 캔버스에 그리기(draw)
class Particle {
  constructor(ctx, WIDTH, HEIGHT) {
    this.ctx = ctx;
    this.WIDTH = WIDTH;
    this.HEIGHT = HEIGHT;
    this.fullAngle = Math.PI * 2;
    this.x = Math.random() * this.WIDTH;
    this.y = Math.random() * this.HEIGHT;
    this.r = 5;
    this.speed = 1;
    this.direction = this.x > 63 ? 1 : -1;
    this.px = Math.floor(this.x);
    this.py = Math.floor(this.y);
  }

  update(phaseSign) {
    this.speed = this.speed <= 0.1 ? 0.1 : this.speed - 0.004;
    this.x += this.direction * this.speed;
    this.r = this.r <= 1 ? 1 : this.r - 0.04;

    if (this.x <= 0 || this.x > this.WIDTH) {
      this.x = Math.random() * this.WIDTH;
      this.y = Math.random() * this.HEIGHT;
      this.direction *= -1;
      if (this.speed < 0.2 && phaseSign > 0) {
        this.y = this.HEIGHT / 2 + this.y / 2;
        this.r = 2;
      }
    }
    this.px = Math.floor(this.x);
    this.py = Math.floor(this.y);
  }

  draw(phase) {
    this.ctx.beginPath();
    this.ctx.fillStyle = phase[this.py][this.px];
    this.ctx.arc(this.x, this.y, this.r, 0, this.fullAngle);
    this.ctx.fill();
  }
}
캔버스 컨텍스트에서 지원하는 getImageData API를 쓰면 이미지를 구성하는 각 픽셀들의 rgba 정보를 알 수 있다.
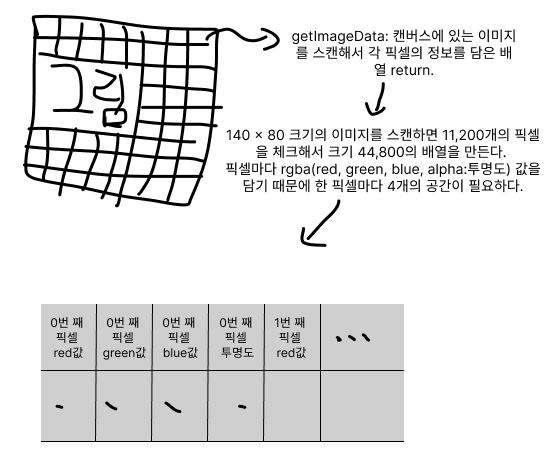
    const getRgbsFromImageData = (imageArray, WIDTH, HEIGHT) => {
      const colorMap = [];
      for (let y = 0; y < HEIGHT; y++) {
        const row = [];
        for (let x = 0; x < WIDTH; x++) {
          const r = imageArray.data[y * 4 * imageArray.width + x * 4];
          const g = imageArray.data[y * 4 * imageArray.width + x * 4 + 1];
          const b = imageArray.data[y * 4 * imageArray.width + x * 4 + 2];
          const color = `rgb(${r},${g},${b})`;
          row.push(color);
        }
        colorMap.push(row);
      }
      return colorMap;
    };
이제 애니메이션을 실행할 입자를 몇 개 만들지 정한다.
  const init = (ctx, WIDTH, HEIGHT) => {
    return Array.from(
      { length: WIDTH },
      () => new Particle(ctx, WIDTH, HEIGHT)
    );
};준비가 끝났다. 애니메이션을 구현해보자.
c. 애니메이션 실행
  const animate = () => {
    if (!onAnimate) return;
    particles.map(setParticle);
    requestAnimationFrame(animate);
  };

  const setParticle = (particle) => {
    particle.update(phaseSign);
    particle.draw(phase);
};- onAnimate가 false이면 애니메이션을 멈춘다.
- true이면 프레임마다 애니메이션을 진행한다.
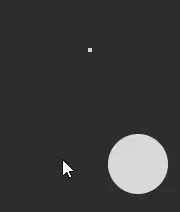
d. 결과
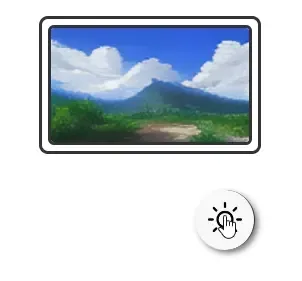
이 결과를 얻기까지 과정이 순탄하지만은 않았는데 중간에 에러가 발생했다. 클릭할수록 애니메이션이 너무 빨라지는 현상이었고, 뭐가 원인인지 몰라서 이틀을 헤매다가 자려고 누웠을 때 어떤 생각이 뇌리를 스쳤다.
‘이벤트 루프 문제일 수 있겠다.’
정말로 그런 문제였고, 해결한 내용은 이벤트 루프(스택, 큐, 렌더) 포스팅 rAF 목차에 작성했다.
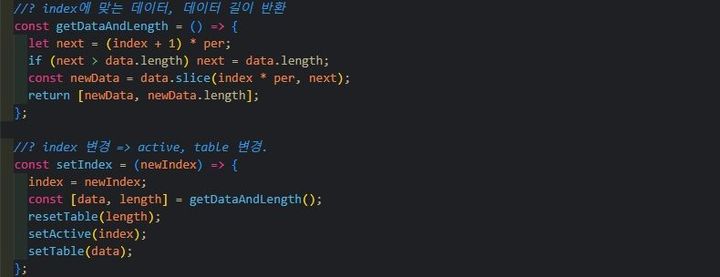
3. 테마 변경
내가 아는 방법은 버튼을 클릭할 때 각 엘리먼트들이 클래스가 바뀌면서 CSS가 변경되는 것 뿐이었다. 하지만 다크 모드, 라이트 모드는 여러 엘리먼트 CSS가 바뀌기 때문에 그런 걸 일일이 다크 모드로 지정하기엔 손이 많이 간다.
프로그래밍에는 여러 원칙이 있지만 요즘 특히 마음에 드는 원칙은 ETC(Easy To Change) 원칙이다. 뭔가를 바꿔야할 땐 노가다가 되어선 안 된다.
Styled-Components에서 글로벌 theme을 적용하면 해결 가능하듯, 일반 CSS로도 같은 방법이 가능하다. 아래와 같이 작성했다.
:root,
[data-theme="default"] {
  --pale-black: #2d2d2d;
  --pale-gray: #ccc;
  --pale-white: #f8f8f8;
  --font-size-xs: 14px;
  --font-size-s: 16px;
  --font-size-m: 18px;
  --font-size-l: 20px;
  --font-size-xl: 24px;
  --title-size-xl: 32px;
  --title-size-l: 30px;
  --title-size-m: 28px;
  --title-size-s: 26px;
  --border-radius-s: 4px;
  --border-radius-m: 6px;
  --border-radius-l: 8px;
  --border-radius-full: 50%;
  --body-bg-color: #fff;
  --text-color: #333;
  --button-shadow: 2px 2px 4px rgba(20, 20, 20, 0.6);
  --button-background-color: var(--pale-white);
  --button-change-background-color: white;
}

[data-theme="dark"] {
  --body-bg-color: #444352;
  --text-color: #efefef;
  --button-shadow: 2px 2px 4px rgba(233, 230, 59, 0.6);
  --button-background-color: var(--pale-gray);
  --button-change-background-color: rgba(27, 27, 27, 0.4);
}
.mode__frame {
position: absolute;
display: flex;
justify-content: center;
align-items: center;
width: 148px;
height: 92px;
padding: 4px;
background-color: var(--body-bg-color);
border: 2px solid var(--text-color);
border-radius: var(--border-radius-m);
animation: display-frame 0.6s ease-in-out;
transition: background-color 0.4s, border-color 0.4s;
}transition-property는 구체적으로 지정하는 게 좋다. 효율도 효율이고 의도하지 않은 효과가 나타날 수도 있다. (이번에 잘 깨달았다.)
JS는 물론 좋다. 하지만 HTML, CSS도 사용하기에 따라서는 뛰어난 도구이기 때문에 이번 프로젝트에서는 HTML 태그, CSS 효과도 적극 활용하는 방향을 지향한다.
  const setup = () => {
    const light = () => {
      const body = document.querySelector("body");
      body.removeAttribute("data-theme");
    };

    const dark = () => {
      const body = document.querySelector("body");
      body.setAttribute("data-theme", "dark");
    };

    const sunImage = "./public/img/sun.png";
    const moonImage = "./public/img/moon.png";
    const phaseMap = new Map();
    phaseMap.set(1, [sunImage, light]);
    phaseMap.set(-1, [moonImage, dark]);
    return phaseMap;
  };

  const changeTheme = (themeSign) => {
    phaseMap.get(themeSign)[1]();
  };

  const setThemeSign = (newThemeSign) => {
    if (themeSign !== newThemeSign) {
      themeSign = newThemeSign;
      changeTheme(themeSign);
      changeButtonImage(themeSign);
    }
  };

  const handleThemeSign = () => {
    setThemeSign(-themeSign);
  };
theme 변경하는 함수는 map의 프로퍼티로 보관했다. map은 key를 여러 타입으로 지정할 수 있다. 원래는 일반 객체를 쓰려고 했는데 객체는 key 값이 문자열이라서 조회가 불편하다는 생각이 들었고, map이 괜찮겠다 싶어서 선택했다.
버튼이 눌릴 때마다 sign은 -1이 곱해지고, sign이 바뀌면 map에서 sign에 맞는 theme 변경 함수를 호출한다.
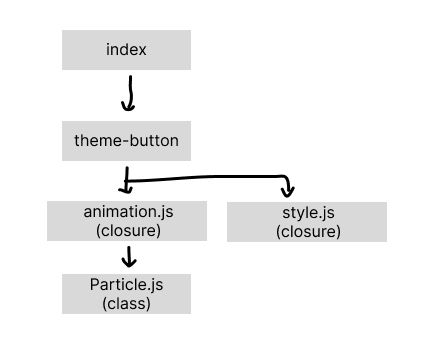
4. 파일 구조
// 메인 js

window.addEventListener("load", () => {
  themeButtonSetup();
  const op = document.querySelector(".opening");
  setTimeout(() => op.remove(), 6000);
});

// theme-button 메인 js

const themeButtonSetup = () => {
  const handleClick = () => {
    handleAnimation();
    handleThemeSign();
  };

  const clearCanvas = () => {
    setTimeout(stopAnimation, 300);
    foldCanvas();
  };

  const button = document.querySelector(".mode__button");
  button.addEventListener("click", handleClick);
  button.addEventListener("mouseenter", displayCanvas);
  button.addEventListener("mouseleave", clearCanvas);
};
선언적으로 알기 쉽도록 작성했다. 자체적으로 쓰는 상태나 함수는 클래스와 클로저를 이용해서 분리했다. 원래는 한 번에 작성했고, 명령형도 섞여있어서 가독성이 엉망이었기 때문에 정리했다.
5. 마무리
테마 버튼 하나 작성할 뿐이지만 클래스, 클로저, 캔버스, 이벤트 루프, 프로그래밍 원칙, 디자인, CSS, 설계, 자료구조...여러 가지를 되짚고 생각하는 시간이었다.